Showing posts with label Web Design. Show all posts
Wednesday, May 2, 2012

Vintage Style RSS Subscribe And Other Social Bookmark Icons Gadget For Blogger

After long time i didnt update my blog because my computer are infected by malicious software lol. And now i will share a Vintage style and other sociaal bookmark icons gadget for blogger, i promise this gadget will make your blog looking smoothy.
Little note : I get this tutorial from spiceupyourblog web design
First, you can see the demo by clicking here
Below is the code for the widget, you can add it manually to Blogger in a Html/Javascript gadget or use the one click add to blogger button below the code. Either way make sure to replace my links in yellow with yours. For Wordpress go to Appearance > Widgets > Add the code to a text widget, once again make sure to change the links in blue.

#0b5394 <style>
a:hover {background-color: transparent;opacity:0.7;}
</style>

<a title="Rss Feed" href="http://feeds.feedburner.com/blogyahyagan" rel="nofollow" target="_blank"><img border="0" src="https://blogger.googleusercontent.com/img/b/R29vZ2xl/AVvXsEhmrYTx-inW1dcfeQQar4zSaZf0cn-PrS8EFxYx78WmYFnCLSjy85pUtFMbEKTebTUdzXmX33K3CdGoS7OwKhAqMgBk8bDso9TRWGM5Gf_rGnpik6v7868bhLkNdwUAfSE83S194KLt0FHA/s1600/rss_48x48.png" /></a>

<a title="Subscribe Via Email Rss" href="http://feedburner.google.com/fb/a/mailverify?uri=blogyahyagan&loc=en_US" rel="nofollow" target="_blank"><img border="0" src="https://blogger.googleusercontent.com/img/b/R29vZ2xl/AVvXsEhN3xAkyC3y9hDFo1YXxWjmjuHoTZxrAXBmn1tJHOfGZJKH89EVRdyXxSO1Q7u5Pag_d-lQ3ZbTMq8B58E9DQSHwbAi30dsAKCLonFQBgZhDI9coJN-S2s1VpjRtEVYVs4uCKh6leTztDwl/s1600/mailrss_48x48.png" /></a>

<a title="Follow On Twitter" href="http://twitter.com/blogyahyagan" rel="nofollow" target="_blank"><img border="0" src="https://blogger.googleusercontent.com/img/b/R29vZ2xl/AVvXsEgRbaGWg89R_mRnl-UD-SeBfnY00DXBuoOOhgfJglutJB-OAz3JGEabfgqIp-FD7vm8irh3DzMHDMCLJGyslcxku6MVj1pfs3mNdG5uWIfTP_qLGtzTEnv_nIzg8DXvgVlBJwtf6xo9_t_J/s1600/twitter_48x48.png" /></a>

<a title="Find Us On Facebook" href="http://facebook.com/blogyahyagan" rel="nofollow" target="_blank"><img border="0" src="https://blogger.googleusercontent.com/img/b/R29vZ2xl/AVvXsEg09lXjGSGVgWN_P_OnsoL5mbreUJz62ib9MMj1UFFW0YduyqD8AidIg1hgVaLMCvf06TfgXbLoknNS7ueyK8Vrk_-aSfVkmOE-ufTG2ZZpS47tiGPiGAvmola9eH6uFxfTGccJDxWOTVB8/s1600/facebook_48x48.png" /></a>

<a title="Add To Circles" href="https://plus.google.com/b/108200902911276741668/108200902911276741668/posts" rel="nofollow" target="_blank"><img border="0" src="https://blogger.googleusercontent.com/img/b/R29vZ2xl/AVvXsEi3t75IQ0G_9_R3KoCT7e-i5H6vUWvFd5NEvl1Q0a-gEP4HT5ex3niDaLS0sDFT2CswtF0b6C3BPIywJwJwnIQqIlgYsi8pvoGyiYhcWIjMrkV2vek32OY8iEY9D5cW8o6_-oOIPZ9PKcPn/s1600/googleplus_48x48.png" /></a>
Finally save it. And the vintage style rss subscribe and social bookmarking icons gadget for blogger will appear on your blog

Read More Vintage Style RSS Subscribe And Other Social Bookmark Icons Gadget For Blogger
Monday, March 12, 2012

Awesome Rss, Facebook and Twitter Counter Widget For Blogger

Awesome Rss, Facebook and Twitter Counter Widget For Blogger
Rss, Facebook and Twitter is the most useful media to promote a website for developer.
Why Rss, Facebook and Twitter become the most useful media for website developer?
Because 52% people in this world used internet to open any social media like Rss, Facebook and Twitter. Just try to compare Rss,Facebook and Twitter
1. Rss has Alexa rank #1 because its a subdomain from google.
2. Facebook has alexarank #2 in world wide and #2 in USA. They reach 44,6% Internet User/day
3. Twitter has rank #9 on world wide and #8 in USA. Reach for 8% Internet user/day.
So i estimate that 52% People in this world will open Rss, Facebook and Twitter per/day.
And web developers see a chance if they optimize their social media network.
Now, how about you? Do you have a Rss, Facebook or twitter account? And are you a web developers? Are you optimize your Rss, Facebook or Twitter account?
 If you asked me "Are you optimize your social media account?"
Exactly i will answer "Not yet!"
I just have 88 Rss Subscriber, 14 Facebook Fans and 1486 Twitter Followers.
I think its a little on rss and facebook and i think thats enough on twitter. So how to optimize your social media account?
i guess that you can install a Rss, Facebook and Twitter Counter widget on your site.
As you can see on my sidebar, you'll look a Rss, Facebook and twitter counter like this
Rss, Facebook And Twitter Counter For Blogger

Ok now lets we go to the step, how to install awesome Rss, Facebook and Twitter Counter Widget For Blogger
1. Login to blogger
2. Go to design-layout
3. Find </b:skin> code
4. Copy this code below before </b:skin> code
.rss-mbt {
background: url(https://blogger.googleusercontent.com/img/b/R29vZ2xl/AVvXsEhEJ1iIRXSH-Frt4qWhNBkyXSCcNPOinq_YE8ow41CrnCgMlh_8JsUN82CzKLQ4MUeiqNDWzdalqxR_WL-HHP-V9yhK6P_fAH9n2gXnQ8mkWOufNXzd333ULsCVHOr9SD-07mwOZvQGvYg/s1600/rss+sepia.png) no-repeat;
height: 64px;
padding: 0px 20px 0px 80px;
margin-top: 5px;
}
.twitter-mbt {
background: url(https://blogger.googleusercontent.com/img/b/R29vZ2xl/AVvXsEgMCrMVD5sXSqgyI8ROYhGzizh9VjulOOhFpdi39dll8qD-lSI_AIpQUCBQZVIkVzBMlc2ta_QxUqqnrI61eWLaJ8_NznCteh8sA5Cg7HaLKCuf5HmzOQChMovZj54w6ZxyxpcTvi6rhV0/s1600/twitter.png) no-repeat;
height: 64px;
padding: 0px 20px 0px 80px;
margin-top: 10px;
}
.facebook-mbt {
background: url(https://blogger.googleusercontent.com/img/b/R29vZ2xl/AVvXsEhmgnQ3NKwcf8QpU3dZqLkrRAVuPwMixeEMI8iyIMU5wptgGuUoM-WZqLXoojt2oYfYxWz63xMbrqdfXlOrzXl7a9Hl-Oh-3Chp5Jw_A-3O-wXjD3Fe_Notgt6wfIieoMGMPlB8qOYQVBc/s1600/fb+sepia.png) no-repeat;
height: 64px;
padding: 0px 20px 0px 80px;
margin-top: 10px;
}
.follower-rss, .follower-twitter, .follower-facebook {
font-family: Georgia,  sans-serif, Times;
font-size: 1.5em;
font-style:italic;
color:#D3C5B1;
padding-top:20px;
text-shadow:1px 1px #B2A99D;
}
.follower-rss a, .follower-twitter a, .follower-facebook a {
color:#AA9C89;
}
.follower-rss span {
font-size: 2.2em;
font-weight: bold;
font-style:italic;
}
.follower-twitter span {
font-size: 1.9em;
font-weight: bold;
font-style:italic;
}
.follower-facebook span {
font-size: 1.9em;
font-weight: bold;
font-style:italic;
}
5. After that save it. 
6. Go to layout and click "add a gadget" button
7. Copy this code below
<div class='rss-mbt'>
<div class='follower-rss'>
<span><a href='http://feeds.feedburner.com/BlogYahyagan'>88</a></span> loyal readers</div></div>
<div class='twitter-mbt'><div class='follower-twitter'><span><a href='http://twitter.com/#!/blogyahyagan'rel="nofollow" >1491</a></span> followers</div></div>
<div class='facebook-mbt'>
<div class='follower-facebook'><span><a href='http://www.facebook.com/blogyahyagan'>14</a></span> followers</div>
</div>
8. Finally save it.
Congratulations, you've dont to install the widget. So this is it the "Awesome Rss, Facebook and Twitter Counter Widget For Blogger"

Note
- Change the url with you own account url
- Change the number (Counter) with your own
Read More Awesome Rss, Facebook and Twitter Counter Widget For Blogger

Blog Yahyagan Launched A New Template Again

Hai guys, now i will share a new template again. Yeah i dont know why i loved to create a template, i just modify my latest template as you can see on Blog Yahyagan New Look
The template is called Yahyagan Dashed Lines
Ok this is the template information
The Template Look Like
Name : Yahyagan Dashed Lines
Author : Yahya Ayyash
Date : 13 March 2012
Author URL : - http://yahyagan.blogspot.com
                     - http://blogyahyagan.blogspot.com

Its a smoothy template and i think you'll love it.
But because i have spent my time to create this template, you must pay for it
Plan 1
Just US$ 3
Plan 2
US$ 2,5 (But you must like my fanpage and subscribe my blog after that you must send an email to me to confirm)
Template Feature 
- 1 Sidebar
- 4 Column Footer
- Subscribe box and search box
- SEO Friendly
- Comment page with reply button
- Breadcrumbs that will indexed on google
- Related Post
- Advertisement Area
- Main Navigation
- Elegant
- And much more...

Note

  • If you want to buy my template you can contact me via email, facebook or twitter
  • And if you have bought my template and you wanted to used image as logo the image size must be 400x130. 
The new logo

And by the way i just create a new logo design for blog yahyagan, and now i change the title into "Blog yahyagan - place of creativity" haha


Read More Blog Yahyagan Launched A New Template Again
Friday, March 9, 2012

Create Beautiful Recent Comment Widget With Avatar on Blogger

Create Beautiful Recent Comment Widget With Avatar on Blogger
Recent comment is a cool widget for me, official blogger team has released the recent comment widget. But that's to simple, so now i will share a recent comment widget with avatar on blogger. Its a beautiful recent comment widget i had ever seen haha
So this is it, Create Beautiful Recent Comment Widget With Avatar on Blogger
You can see the preview on my sidebar, "Recent" on tab navigation.

The Step
1. Login to blogger
2. Go to design - add a gadget
3. Paste this code below
<style type="text/css">
    ul.w2b_recent_comments{list-style:none;margin:0;padding:0;}
    .w2b_recent_comments li{background:none !important;margin:0 0 6px !important;padding:0 0 6px 0 !important;display:block;clear:both;overflow:hidden;list-style:none;}
    .w2b_recent_comments li .avatarImage{padding:3px;background:#fefefe;-webkit-box-shadow:0 1px 1px #ccc;-moz-box-shadow:0 1px 1px #ccc;box-shadow:0 1px 1px #ccc;float:left;margin:0 6px 0 0;position:relative;overflow:hidden;}
    .avatarRound{-webkit-border-radius:100px;-moz-border-radius:100px;border-radius:100px;}
    .w2b_recent_comments li img{padding:0px;position:relative;overflow:hidden;display:block;}
    .w2b_recent_comments li span{margin-top:4px;color: #666;display: block;font-size: 12px;font-style: italic;line-height: 1.4;}
</style>
<script type="text/javascript">
//<![CDATA[
    // Recent Comments Settings
    var
    numComments     = 5,
    showAvatar     = true,
    avatarSize     = 50,
    roundAvatar    = true,
    characters     = 70,
    showMorelink    = false,
    moreLinktext    = "More ",
    defaultAvatar     = "http://www.gravatar.com/avatar/?d=mm",
    hideCredits    = true;
//]]>
</script>
<script type="text/javascript" src="http://bloggerblogwidgets.googlecode.com/svn/trunk/w2b-recent-comments-w-gravatar.js"></script>
<script type="text/javascript" src="http://blogyahyagan.blogspot.com/feeds/comments/default?alt=json&callback=w2b_recent_comments&max-results=5"></script>
4. And save it.

Recent Comment Widget
Just Info
NumComments = the numbers of comment that will showed on your site
ShowAvatar = true/false
AvatarSize = the size of avatar you will used
roundAvatar = true/false
characters = the max character that will showed
showmorelink = true/false
morelinktext = the "more" link text that will showed
defaultAvatar = the url of default avatar
hideCredits = true/false (Credits Way2blogging)

ok maybe that's it. Create Beautiful Recent Comment Widget With Avatar on Blogger.
Please Subscribe us, and share this article into your social network 
Next Post 25 Dofollow Blog List With PR 5-3 2012
Read More Create Beautiful Recent Comment Widget With Avatar on Blogger
Wednesday, March 7, 2012

Stylish jQuery Image Slideshow For Blogger

jQuery is a great user interface and programming for web design. After long time i didnt write a post about jQuery now i will share nice article to you "Stylish jQuery Image Slideshow For Blogger"
I got this post from spiceupyourblog again haha.
Ok this is it Stylish jQuery Image Slideshow For Blogger

Step
1. You can see the demo by clicking here
2. Backup your template first
3. Design - Edit HTML - Expand Widget Template
4. Find </b:skin> code
5. Copy this code below before </b:skin> code
/* Start Slider Code From http://www.spiceupyourblog.com/ */

ul.bjqs{position:relative; list-style:none;padding:0;margin:0;overflow:hidden; display:none;}
li.bjqs-slide{display:none;position:absolute;}

ul.bjqs-controls{list-style:none;margin:0;padding:0;z-index:9999;max-width:100%;}

ol.bjqs-markers{list-style:none;margin:0;padding:0;z-index:9999;}
ol.bjqs-markers li{float:left;}

p.bjqs-caption{display:block;max-width:96%;margin:0;padding:2%;position:absolute;bottom:0;background:rgba(0,0,0,0.7);color:#fff;-moz-border-radius: 6px;-webkit-border-radius: 6px;-moz-box-shadow: 4px 4px 4px #dddddd;-webkit-box-shadow: 4px 4px 4px #dddddd;}

}
/* End Slider Code From http://www.spiceupyourblog.com/ */
6. And now find </head> code
7. Copy this code below before </head> code
<!-- Start Slider Code From http://www.spiceupyourblog.com/ -->

<script src='http://code.jquery.com/jquery-1.6.1.min.js' type='text/javascript'/>
<script src='http://yourjavascript.com/9921010228/basic-jquery-slider.min.js' type='text/javascript'/>
<script type='text/javascript'>
$(document).ready(function(){
$(&#39;#my-slideshow&#39;).bjqs({
&#39;width&#39; : 940,
&#39;height&#39; : 340,
&#39;showMarkers&#39; : true,
&#39;showControls&#39; : true,
&#39;centerMarkers&#39; : false
});
});
</script>
<!-- End Slider Code From http://www.spiceupyourblog.com/ -->
8. Save your template

Adding Gadget
1. Go to layout - Add new gadget
2. Choose HTML/Javascript
3. Copy this code below
<div id="my-slideshow">
<ul class="bjqs">
<li><img title="This is a caption." src="https://blogger.googleusercontent.com/img/b/R29vZ2xl/AVvXsEj81oVg3e9UUcIpxp0Gljz1PAjHnshXSRvp6nX04kdslCe-RC0uRvkaoPbozAJaNpom8mT5KRz4tcfQqgKNH49a2-Ofwn73jC4Arx4TPysES-ntky2FltxfQ3E5BvhGD0dxLFKSbEvKeLO3/s1600/slider-image1.jpg"/></li>

<li><img title="This is a another caption." src="https://blogger.googleusercontent.com/img/b/R29vZ2xl/AVvXsEh6MeUeamUqXi2zN1MjZmv5BIipWN0zzJmVRwL-g81sjQYR3-iQ23cpCVD_e-Et0NN-A8I8ze-qmA1pJqJGW0cWnVN4OZljeY4KCXPjkjUv0Zq2ISd-rWwdX68Wqb0qD9Vu4GP3sYPuJV9Q/s1600/slider-image2.jpg"/></li>

<li><img title="This is a another longer caption." src="https://blogger.googleusercontent.com/img/b/R29vZ2xl/AVvXsEhhmirGF1bdIrxTsBzr2yxxrGPvFpqX2llkfCJ-oULwWUt1ZT-ik7JD3B6sreNjHb57QJuM8J0OnwuQnD58AhhvpHs0_LdXoON64hA6RYsRQOAU6KIKk6p7RJ26Ccwxm3EtWfoGlJ11R6yC/s1600/slider-image-3.jpg"/></li>

<li><img title="This is a another much longer caption." src="https://blogger.googleusercontent.com/img/b/R29vZ2xl/AVvXsEgdf527gFSEJu0JIgFipg3fav8qMOeQ0f1k3fIzbFHbzgg_WKfK-lPWg1RRBp6_GAtW2zwp7uHvo7-aQ6istFd1UppdLWfCYD4Wrui3K3yE8m8tX9SL00xFdVzR3H85xQBlULlWXsKjK7z7/s1600/slider-image4.jpg"/></li>

<li><img title="This is a another longer caption that can be the lenght of the image or even longer onto the next line." src="https://blogger.googleusercontent.com/img/b/R29vZ2xl/AVvXsEgJ3ZpFmgE7-VbZvwHfEP0OBuF7YyyZkC7I0gYDhBm2PATN_mcag8F3z6uItTydgIwozTH5E81iT6J_ehyf-2aUIZCVd7GPw6WzcIlNxLmhMHQ4kVYIhgQysWdJAwNDMUx-kTXSFk4CETGt/s1600/slider-image5.jpg"/></li>
</ul>
</div>
4. Last step is save it
5. And you're done. Congratulations with your new slideshow gadget

Important
I've marked some text with other colour, and you can change the value or the text on the marked text with your own. Like Height and Width or Caption and Image
Next post Create Beautiful Recent Comment Widget With Avatar
Source : Spiceupyourblog
Read More Stylish jQuery Image Slideshow For Blogger
Friday, March 2, 2012

Docked Sidebar Gadget on Blogger Dynamic View

Maybe is too late for me to post this article, but its a great news for blogger user. Why?
Because "blogger team has launched Docked Sidebar on Dynamic Template"

What is Dynamic View?
Dynamic Views are a set of templates that make it easy and fun to explore a blog. As you might expect, we’ve made the gadgets interactive too. Instead of appearing in a panel that consumes valuable real estate on your blog, gadgets now appear in a dock that slides in and out as you move your cursor over them.
Dynamic view has launched by blogger team on 2011, and now they update it. The reason of why blogger user aren't use dynamic view on them site 90% is because "Dynamic view template doesnt have a Sidebar to place our widget". And now blogger team have update it i think some people are used dynamic view now.
And how about the Docked Sidebar Gadget on Blogger Dynamic View?

Look this screenshot below
Docked Sidebar on Blogger Dynamic View
Need more answer? You can visit the official blogger team here  official Blogger blog.
Next post Simple Tips to Reduce Bounce Rate
Or Put your question below:
Read More Docked Sidebar Gadget on Blogger Dynamic View

Blog Yahyagan New Look

Hai guys, my followers, my subscriber and somewho which read this article on my blog. Today i've completed my project, just my small project. Ya i've finished my own template, its my first template! Do you like it? Blog Yahyagan New Look

Homepage

Comment Page
And i'm very love the comment page, why? because i think it look like wordpress haha. I love blogger interface and feature. But i think wordpress interface are better, so i want a blogger template but the user interface is like wordpress. Finally i can do it!!
Template Information
Template name : Yahyagan
Author : Yahya Ayyash
Author URL : http://blogyahyagan.blogspot.com
And now i will publish this template to you. Hmm but sorry because i've spent my time to create and redesigned this template, so isnt free. But its always cheap.
Just US$ 3.00 
and US$ 1.50 if you've like my fanpage, subscribe my feeds and follow my blog. (Just sent an e-mail to me yahyaganblog@gmail.com to verify that you've done).
Template Feature
  • 1 Column Sidebar
  • Wordpress Style on Comment Page
  • 4 Column Footer
  • SEO Friendly
  • Breadcrumbs
  • Beautiful Subscribe Box
  • Ads Ready
  • jQuery Tabs Widget
  • Etc.
Thanks for be my subscriber or followers, btw i will give this template FOR FREE just for 3 person. Contact me ok?
Next post Docked Sidebar Gadget on Blogger Dynamic View
Read More Blog Yahyagan New Look
Saturday, February 18, 2012

Add an Animated Rainbow Link To Your Blog

Adding an Animated Rainbow Link To Your Blog
In this post i have a neat effect for the links on your blog. Maybe you've look some blog with this effect. Using some javascript you can make the links on your blog change through different colors when the cursor is hovered over them. The text link will be chaned into the rainbow color, if we hovered them. The effect comes from Dynamic Drive and we have a one click button to add it to your blog in seconds. Check out the demo below, simply hover your cursor over the post titles or any of the links on the demo blog. I got this tutorial from spiceupyourblog
Click the link below to see the preview. Add a Rainbow Link To Your Blog
Add Rainbow Links To Your Blog

Copy this code below before <head>code
<script src="rainbow.js">

/*
Rainbow Links Script- TAKANASHI Mizuki
For full source code, 100's more DHTML scripts, and TOS,
Visit http://www.dynamicdrive.com
*/

</script>
Save your template.
That's it a cool effect for your links, check out more of our Blogger Gadgets.
Next post 6 Best Free Wordpress Social Bookmarking Plugin
Source :  spiceupyourblog
Read More Add an Animated Rainbow Link To Your Blog
Friday, February 17, 2012

CSS Text Shadow - Create a Shadow On Your Text

CSS Text Shadow , Create a Shadow On Your Text
Hai guys, now i will share a great CSS Tutorial to you. Ya, CSS Text Shadow, maybe some of you have known how to do this. Its just a simple CSS tricks.
Ok, this is it CSS Text Shadow Tutorial


Regular text shadow:
p { text-shadow: 1px 1px 1px #000; }
Example :
Yahyagan Blog CSS Text Shadow 
The first two values specify the length of the shadow offset. The first value specifies the horizontal distance and the second specifies the vertical distance of the shadow. The third value specifies the blur radius and the last value describes the color of the shadow:

1. value = The X-coordinate
2. value = The Y-coordinate
3. value = The blur radius
4. value = The color of the shadow

Using positive numbers as the first two values ends up with placing the shadow to the right of the text horizontally (first value) and placing the shadow below the text vertically (second value).

The third value, the blur radius, is an optional value which can be specified but don’t have to. It’s the amount of pixels the text is stretched which causes a blur effect. If you don’t use the third value it is treated as if you specified a blur radius of zero.
More Example :


1. Multiple Text Shadow
{text-shadow: 0.2em 0.5em 0.1em #600,
-0.3em 0.1em 0.1em #060,
0.4em -0.3em 0.1em #006}

Yahyagan Blog 
2. Other Placement
{text-shadow: -1px -1px white, 1px 1px #333}
{text-shadow: 1px 1px white, -1px -1px #333}
Text Shadow Property
By Yahyagan Blog
Ok, thats it the CSS Text Shadow Tutorial.

Source : erasparsa
Next Post Add an Animated Rainbow Link To Your Blog
Keyword For This Article :
CSS Text Shadow, Text Shadow Property, Create a Shadow on your Blogger Text
Read More CSS Text Shadow - Create a Shadow On Your Text
Saturday, February 11, 2012

Create An Awesome Social Media Widget With Hover Effect

Create an awesome social media widget with hover effect
Social media is a great way to increase your visitor, if you have many follower on twitter, friend on facebook, subscriber on RSS feed or many friend on your google+ account. I guess that if you share a link on your social media account, you'll get many visitor from that. Because you've connected to other people on social media. But how to get more friend on social media?
I think create an social media widget on your site is the great way, just place a link to your social media account. And now i will give a tutorial to you, how to create an awesome social media widget with hover effect! Not just a simple link to your social media account, but with an image with hover effect. I guess that your visitor will be interest to click that.
1. Login to blogger
2. Design - Edit HTML
3. Find </b:skin> code, you can use Ctrl + F
3. Before that code, paste this code below
ul.social {
    list-style: none;
    margin: 10px;
    overflow: hidden;
margin-bottom:20px;
}

.social li {
    float: left;
    background: none !important;
    padding: 0 !important;
    margin: 0 8px;
}

.social li a {
    display: block;
    width: 40px;
    height: 40px;
}

.social li.rssicon a {
    background:url(http://i1212.photobucket.com/albums/cc451/ramseyinjury/Blog%20Yahyagan/RSS.png);  margin-right:20px; margin-left:40px;
}

.social li.twicon a {
    background:url(http://i1212.photobucket.com/albums/cc451/ramseyinjury/Blog%20Yahyagan/Twitter.png);margin-right:20px;
}

.social li.fbicon a {
    background:url(http://i1212.photobucket.com/albums/cc451/ramseyinjury/Blog%20Yahyagan/Facebook.png);margin-right:20px;
}

.social li.gicon a {
    background:url(http://i1212.photobucket.com/albums/cc451/ramseyinjury/Blog%20Yahyagan/Google.png);
}

.social li.rssicon a:hover {
    background:url(http://i1212.photobucket.com/albums/cc451/ramseyinjury/Blog%20Yahyagan/RSShover.png);
}

.social li.twicon a:hover {
    background:url(http://i1212.photobucket.com/albums/cc451/ramseyinjury/Blog%20Yahyagan/Twitterhover.png);
}

.social li.fbicon a:hover {
    background:url(http://i1212.photobucket.com/albums/cc451/ramseyinjury/Blog%20Yahyagan/Facebookhover.png);
}

.social li.gicon a:hover {
    background:url(http://i1212.photobucket.com/albums/cc451/ramseyinjury/Blog%20Yahyagan/Googlehover.png);
}

4. Save it
Notice :

I hosted my image on my photobucket account, please hosted your image at your own Hosting.
5. Go to design tab again
6. Add a gadet - Choose HTML/Javascript
7. And then paste this code below
<ul class='social'>
<li class='rssicon'><a href='http://feeds.feedburner.com/blogyahyagan'/></a></li><li class='twicon'><a href='http://twitter.com/blogyahyagan'/></a></li><li class='fbicon'><a href='http://facebook.com/23arshavin'/></a></li><li class='gicon'><a href='https://plus.google.com/105370464976454684137'/></a></li></ul>
IMPORTANT : Change the text marked red with your own username!
And then save it.
Ok thats the tutorial how to Create An Awesome Social Media Widget With Hover Effect. Take 5 Second to share it!
Next post 41 High Pagerank Dofollow Social Bookmarking Site 2012

Inspired from : Way2Blogging
Read More Create An Awesome Social Media Widget With Hover Effect

Awesome jQuery Facebook Likebox Popup For Blogger

And now, the great web design tutorial again. Yeah, now i will share a great blogger stuff to you. Hmm "Awesome jQuery Facebook Likebox Popup For Blogger" maybe?
The most searched blogger stuff is Popup Facebook fanpage, because if your fan page has liked by a thousand or more people, i think you've a lot of traffic. Ok so this is it Awesome jQuery Facebook Likebox Popup For Blogger

Add Awesome Facebook Likebox Popup

1. Login to your blogger account
2. Go to Design tab
3. Click "Add a Gadget" and then choose "HTML/javascript"
4. Paste the following code instead it


    <style>
        /* Jquery Facebook Likebox Popup Version 2.0 by MBT    MyBloggerTricks.com
        */
        #colorbox, #cboxOverlay, #cboxWrapper{position:absolute; top:0; left:0; z-index:9999; overflow:hidden;}
        #cboxOverlay{position:fixed; width:100%; height:100%;}
        #cboxMiddleLeft, #cboxBottomLeft{clear:left;}
        #cboxContent{position:relative;}
        #cboxLoadedContent{overflow:auto;}
        #cboxTitle{margin:0;}
        #cboxLoadingOverlay, #cboxLoadingGraphic{position:absolute; top:0; left:0; width:100%;}
        #cboxPrevious, #cboxNext, #cboxClose, #cboxSlideshow{cursor:pointer;}
        .cboxPhoto{float:left; margin:auto; border:0; display:block;}
        .cboxIframe{width:100%; height:100%; display:block; border:0;}
        /*


           User Style:
           Change the following styles to modify the appearance of ColorBox.  They are
           ordered & tabbed in a way that represents the nesting of the generated HTML.
        */
        #cboxOverlay{background:#000;opacity:0.5 !important;}
        #colorbox{
                box-shadow:0 0 15px rgba(0,0,0,0.4);
               -moz-box-shadow:0 0 15px rgba(0,0,0,0.4);
                -webkit-box-shadow:0 0 15px rgba(0,0,0,0.4);
               }
         

       #cboxTopLeft{width:14px; height:14px; background:url(https://blogger.googleusercontent.com/img/b/R29vZ2xl/AVvXsEiG1kcbkzEhmdzr2s4Bn550w6OdVdwifrlfKyCGJP4l8cyKq0v1TDBU2iecePOpycQJ-xuQjMfqXS_inP8u4iJUPgVY3-6A1AKyQhDu6nn03LAs6QBHpuBSZjasfV2imqsZh1gzzM8p4tg/s1600/controls.png) no-repeat 0 0;}
    #cboxTopCenter{height:14px; background:url(https://blogger.googleusercontent.com/img/b/R29vZ2xl/AVvXsEgdiP11mU_MA8LKJ-CRqkvljrz3qZb4zO3_trP-LTGc9qMoJvB7nI8R3UDqcBEFhKRtrIxz1vlOZST_ucSQBHHlDxBid6e8_YhllD4emvds2TopacJelBJles7mp7CyDFhqXY42zaOJiWU/s400/border.png) repeat-x top left;}
        #cboxTopRight{width:14px; height:14px; background:url(https://blogger.googleusercontent.com/img/b/R29vZ2xl/AVvXsEiG1kcbkzEhmdzr2s4Bn550w6OdVdwifrlfKyCGJP4l8cyKq0v1TDBU2iecePOpycQJ-xuQjMfqXS_inP8u4iJUPgVY3-6A1AKyQhDu6nn03LAs6QBHpuBSZjasfV2imqsZh1gzzM8p4tg/s1600/controls.png) no-repeat -36px 0;}
        #cboxBottomLeft{width:14px; height:43px; background:url(https://blogger.googleusercontent.com/img/b/R29vZ2xl/AVvXsEiG1kcbkzEhmdzr2s4Bn550w6OdVdwifrlfKyCGJP4l8cyKq0v1TDBU2iecePOpycQJ-xuQjMfqXS_inP8u4iJUPgVY3-6A1AKyQhDu6nn03LAs6QBHpuBSZjasfV2imqsZh1gzzM8p4tg/s1600/controls.png) no-repeat 0 -32px;}
        #cboxBottomCenter{height:43px; background:url(https://blogger.googleusercontent.com/img/b/R29vZ2xl/AVvXsEgdiP11mU_MA8LKJ-CRqkvljrz3qZb4zO3_trP-LTGc9qMoJvB7nI8R3UDqcBEFhKRtrIxz1vlOZST_ucSQBHHlDxBid6e8_YhllD4emvds2TopacJelBJles7mp7CyDFhqXY42zaOJiWU/s400/border.png) repeat-x bottom left;}
        #cboxBottomRight{width:14px; height:43px; background:url(https://blogger.googleusercontent.com/img/b/R29vZ2xl/AVvXsEiG1kcbkzEhmdzr2s4Bn550w6OdVdwifrlfKyCGJP4l8cyKq0v1TDBU2iecePOpycQJ-xuQjMfqXS_inP8u4iJUPgVY3-6A1AKyQhDu6nn03LAs6QBHpuBSZjasfV2imqsZh1gzzM8p4tg/s1600/controls.png) no-repeat -36px -32px;}
        #cboxMiddleLeft{width:14px; background:url(https://blogger.googleusercontent.com/img/b/R29vZ2xl/AVvXsEiG1kcbkzEhmdzr2s4Bn550w6OdVdwifrlfKyCGJP4l8cyKq0v1TDBU2iecePOpycQJ-xuQjMfqXS_inP8u4iJUPgVY3-6A1AKyQhDu6nn03LAs6QBHpuBSZjasfV2imqsZh1gzzM8p4tg/s1600/controls.png) repeat-y -175px 0;}
        #cboxMiddleRight{width:14px; background:url(https://blogger.googleusercontent.com/img/b/R29vZ2xl/AVvXsEiG1kcbkzEhmdzr2s4Bn550w6OdVdwifrlfKyCGJP4l8cyKq0v1TDBU2iecePOpycQJ-xuQjMfqXS_inP8u4iJUPgVY3-6A1AKyQhDu6nn03LAs6QBHpuBSZjasfV2imqsZh1gzzM8p4tg/s1600/controls.png) repeat-y -211px 0;}
        #cboxContent{background:#fff; overflow:visible;}
            #cboxLoadedContent{margin-bottom:5px;}
            #cboxLoadingOverlay{background:url(https://blogger.googleusercontent.com/img/b/R29vZ2xl/AVvXsEjklYVo9fPMW1Aj5rzaJ7pbAbJdua6WOEUXv31M1b5gXFrpbx5mG5bKW3oADiHqCkROWxA6yKY8O6oEYi2L7yIQUhWaAfsOPPxwfT6r9HKr732pmxoQWGrVpIG69sJnZ10KLdi9_U8Hh1g/s400/loadingbackground.png) no-repeat center center;}
            #cboxLoadingGraphic{https://blogger.googleusercontent.com/img/b/R29vZ2xl/AVvXsEh2_xis4sPKnA5TAvm_KxSA513k4171LLi5WBxqcXM-i8Y0Qg4NWpucuv0as0fKIK17m7mj-yz52_kjjpU1Zfa2VFlh0FqIC94rGrnmbBY_0Q-Xk3dD5MaaKC0RaZ-m6ZZfc_9j2jejP0I/s400/loading.gif) no-repeat center center;}
            #cboxTitle{position:absolute; bottom:-25px; left:0; text-align:center; width:100%; font-weight:bold; color:#7C7C7C;}
            #cboxCurrent{position:absolute; bottom:-25px; left:58px; font-weight:bold; color:#7C7C7C;}
            #cboxPrevious, #cboxNext, #cboxClose, #cboxSlideshow{position:absolute; bottom:-29px; background:url(https://blogger.googleusercontent.com/img/b/R29vZ2xl/AVvXsEiG1kcbkzEhmdzr2s4Bn550w6OdVdwifrlfKyCGJP4l8cyKq0v1TDBU2iecePOpycQJ-xuQjMfqXS_inP8u4iJUPgVY3-6A1AKyQhDu6nn03LAs6QBHpuBSZjasfV2imqsZh1gzzM8p4tg/s1600/controls.png) no-repeat 0px 0px; width:23px; height:23px; text-indent:-9999px;}
            #cboxPrevious{left:0px; background-position: -51px -25px;}
            #cboxPrevious.hover{background-position:-51px 0px;}
            #cboxNext{left:27px; background-position:-75px -25px;}
            #cboxNext.hover{background-position:-75px 0px;}
            #cboxClose{right:0; background-position:-100px -25px;}
            #cboxClose.hover{background-position:-100px 0px;}
            .cboxSlideshow_on #cboxSlideshow{background-position:-125px 0px; right:27px;}
            .cboxSlideshow_on #cboxSlideshow.hover{background-position:-150px 0px;}
            .cboxSlideshow_off #cboxSlideshow{background-position:-150px -25px; right:27px;}
            .cboxSlideshow_off #cboxSlideshow.hover{background-position:-125px 0px;}

        /*-----------------------------------------------------------------------------------*/
        /*   Facebook Likebox popup For Blogger Version 2.0
        /*-----------------------------------------------------------------------------------*/
        #subscribe {
            font: 12px/1.2 Arial,Helvetica,san-serif; color:#666;
        }
        #subscribe a,
        #subscribe a:hover,
        #subscribe a:visited {
            text-decoration:none;
        }
        .box-title {
           color: #F66303;
           font-size: 18px !important;
           font-weight: bold;
           margin: 10px 0;
        border:1px solid #ddd;
        -moz-border-radius:6px;
        -webkit-border-radius:6px;
        border-radius:6px;
        box-shadow: 5px 5px 5px #CCCCCC;
        padding:10px;
        line-height:25px; font-family:arial !important;
        }


        .box-tagline {
           color: #999;
           margin: 0;
           text-align: center;
        }
        #subs-container {
            padding: 35px 0 30px 0;
            position: relative;
        }
        a:link, a:visited {
        border:none;
        }
        .demo {
        display:none;
        }


    /* ---------MBT Subscribe Form---------- */

        .box-title1 {
        border:1px solid #ddd;
        -moz-border-radius:6px;
        -webkit-border-radius:6px;
        border-radius:6px;
        box-shadow: 5px 5px 5px #CCCCCC;
            padding:10px;
      margin: 10px 0;
        }


        .enteryouremail{
    background: #fff !important;

    border: 1px solid #d2d2d2;
    padding: 0px 8px 0px 8px;
    color: #a19999; font-size: 12px;
    height: 25px; width: 165px;
    border-radius: 5px;
    -moz-border-radius: 5px;
    -webkit-border-radius: 5px;
    margin:0px;
    }

        .submitbutton{
    background:#F66303;
    border: 1px solid #F66303;
    text-shadow: 1px 1px 1px #333;
    box-shadow: 3px 3px 3px #666;
    font:bold 12px Arial, sans-serif;
    color: #fff;
    height: 25px;
    padding: 0 12px 0 12px;
    margin: 0 0 0 5px;
    border-radius: 5px;
    -moz-border-radius: 5px;
    -webkit-border-radius: 5px;
    cursor:pointer;}

        </style>

    <script src='https://ajax.googleapis.com/ajax/libs/jquery/1.6.1/jquery.min.js'></script>
    <script src="http://mybloggertricks.googlecode.com/files/jquery.colorbox-min.js"></script>
    <script type="text/javascript">
    jQuery(document).ready(function(){
       if (document.cookie.indexOf('visited=true') == -1) {
           var fifteenDays = 1000*60*60*24*30;
           var expires = new Date((new Date()).valueOf() + fifteenDays);
           document.cookie = "visited=true;expires=" + expires.toUTCString();
       $.colorbox({width:"400px", inline:true, href:"#subscribe"});
           }
    });
    </script>
    
    
            <div style='display:none'>
           <div id='subscribe' style='padding:10px; background:#fff;'>
                <h3 class="box-title">Receive all updates via Facebook. Just Click the Like Button Below<center><p style="line-height:3px;" >▼</p></center></h3>
              <center>

    
    <iframe src="//www.facebook.com/plugins/likebox.php?href=http%3A%2F%2Fwww.facebook.com%2FBlogYahyagan&amp;width=300&amp;colorscheme=light&amp;show_faces=true&amp;border_color=%23ffffff&amp;stream=false&amp;header=false&amp;height=258" scrolling="no" frameborder="0" style="border:none; overflow:hidden; width:300px; height:258px;" allowtransparency="true"></iframe>

    </center>
    <div class="box-title1 ">

    <center>
    <h3 style="color:#F66303;">You can also receive Free Email Updates:</h3>
        <form action="http://feedburner.google.com/fb/a/mailverify" method="post" target="popupwindow" onsubmit="window.open('http://feedburner.google.com/fb/a/mailverify?uri=BlogYahyagan', 'popupwindow', 'scrollbars=yes,width=550,height=520');return true"><input gtbfieldid="10" class="enteryouremail" name="email" value="Enter your email here..." onblur="if (this.value == &#39;&#39;) {this.value = &#39;Enter your email here...&#39;;}" onfocus="if (this.value == &#39;Enter your email here...&#39;) {this.value = &#39;&#39;;}" type="text" /><input value="BlogYahyagan" name="uri" type="hidden" /><input value="Submit" class="submitbutton" type="submit" /></form>

    </center>
    </div>

    <!--Please Do not Remove the Credits -->
        <p style=" float:right;  margin-right:35px;  font-size:9px;" >Powered By <a style=" font-size:9px; color:#3B78CD; text-decoration:none;" href="http://www.mybloggertricks.com">Blogger Widgets</a></p>
        </div>
        </div>
5. Save it, and you'll see how the "Awesome jQuery Facebook Likebox Popup For Blogger" look like

Information

Make this change :

  •  *30 Setting this value will effect cookie refreshment. I have set the popup to appear only once to the visitor and this popup will appear again after 30 days. If you wish to display popup to your visitors after a week then set 30 to 7. Similar if you want it to appear daily then set 30 to 1. Note that if you set the value to low then it can irritate your daily readers.
  • Replace BlogYahyagan with your facebook username. If your facebook username is too long and includes numbers then do not panic and first create a Branded Facebook username for your blog in seconds by going to Facebook.com/username
  • Next replace twice BlogYahyagan with your feed title. It appear at the end of your feed link. 
6. Save the widget and place/drag where anything you want.
7. Save it

Visit your blogs and see it popping up just fine! Remember as we already mentioned on previous post that the popup will show only once. To see it again you will first need to delete your browser cookie and then refresh the page to see it appearing again.
Next Post Create An Awesome Social Media Widget With Hover Effect
Source : MyBloggerTricks
Read More Awesome jQuery Facebook Likebox Popup For Blogger
Friday, January 20, 2012

Threaded Comment Replies Added To All Blogger Comment Forms

How to add Threaded comment replies to your blog, Threaded Comment Replies Added To All Blogger Comment Forms
Threaded Comment On Blogger
While that tutorial was a valid option to allow readers to reply to comments it did not place the reply to each comment in a threaded fashion. In fact many of the comments on that post asked was it possible to have the reply placed under the original comment. After so many many requests the Blogger Team have taken note and today Threaded comment replies are now available on Blogger.

And now i will share this tutorial to you, hmm i know this trick from spice up your blog. You can visit that blog for other information or visit blogger team. As you see on my blog, if you commented on my blog post, my comment box are threaded. because i've tried this tutorial and its work. Ok so this is it. How To Add Threaded Comment Replies To Your Blog.

How to activate comment replies on Blogger

For most people the threaded comment replies will be activated automatically on your blog. If you cant see the comment replies here is a check list to get them working :

Comment form is set as embed - Go to your settings > Comments > Comment Form Placement > Tick "Embedded below post" and make sure to scroll to the foot of the page and save.

Site feed is set to full - Got to settings > Site feed > Allow Blog Feeds > From the drop down menu choose " Full" and make sure to scroll to the foot of the page and save.

If none of this is working it could be your template, leave a comment.

 Latest post "Create Google Breadcrumbs On Blogger"
Source : SpiceUpYourBlog
Read More Threaded Comment Replies Added To All Blogger Comment Forms
Saturday, January 14, 2012

20 Best Font For Web Designer - Free

20 Best Free Font For Web Designer, Best Font For Web Design, Great Font For Web Design.
Ok guys, now i will share to you 20 Best Free Font For Web Designer. I think you like to spice up your site. And sometime you're confused because you've many font on your Computer. And now i will recommend to you 20 Best Free Font for Web Designer. The font is smoothy and easy too look. its a clear font but still elegant. i think you'll in love with them. Ok this is it 20 Best Free Font For Web Designer
20 Best Font For Web Designer

20 best free font for web designer, best font for webdesigner, great and wonderful font for webdesigner

20 best free font for web designer, best font for webdesigner, great and wonderful font for webdesigner

20 best free font for web designer, best font for webdesigner, great and wonderful font for webdesigner

20 best free font for web designer, best font for webdesigner, great and wonderful font for webdesigner

20 best free font for web designer, best font for webdesigner, great and wonderful font for webdesigner

20 best free font for web designer, best font for webdesigner, great and wonderful font for webdesigner

20 best free font for web designer, best font for webdesigner, great and wonderful font for webdesigner

20 best free font for web designer, best font for webdesigner, great and wonderful font for webdesigner

20 best free font for web designer, best font for webdesigner, great and wonderful font for webdesigner

20 best free font for web designer, best font for webdesigner, great and wonderful font for webdesigner

20 best free font for web designer, best font for webdesigner, great and wonderful font for webdesigner

20 best free font for web designer, best font for webdesigner, great and wonderful font for webdesigner

20 best free font for web designer, best font for webdesigner, great and wonderful font for webdesigner

20 best free font for web designer, best font for webdesigner, great and wonderful font for webdesigner

20 best free font for web designer, best font for webdesigner, great and wonderful font for webdesigner

20 best free font for web designer, best font for webdesigner, great and wonderful font for webdesigner

20 best free font for web designer, best font for webdesigner, great and wonderful font for webdesigner

20 best free font for web designer, best font for webdesigner, great and wonderful font for webdesigner

20 best free font for web designer, best font for webdesigner, great and wonderful font for webdesigner

20 best free font for web designer, best font for webdesigner, great and wonderful font for webdesigner

Ok thats it, 20 Best Font For Web Designer. I hope it can be useful for you. Thanks Before. Please support me by following or subscribing this blog.
Next Post "Threaded Comment Replies Added To All Blogger Template"
Source : http://www.webdesigndev.com/web-development/20-best-free-fonts-for-web-design
Read More 20 Best Font For Web Designer - Free
Friday, January 13, 2012

Create Google Breadcrumbs On Blogger

Create google breadcrumbson blogger, show breadcrumbs on google result page, Google Breadcrumbs On SERP.
Hai guys, maybe if you are my blog followers you knew that i have shared a post like this post title. But youre wrong! Its true if you think i've create another post about breadcrumbs navigation, and what the different on this post? Just the google word before the breadcrumbs? Yeah youre right. So now we will learn how to create google breadcrumbs on blogger.
I will tell you what the different.
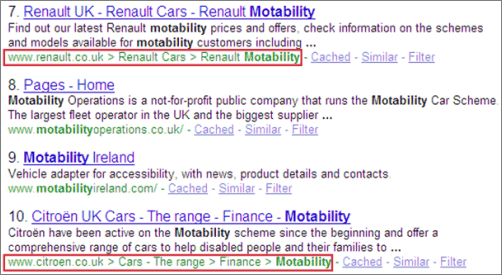
Its called Breadcrumbs Navigation
And this is Google Breadcrumbs
So, know we know that if we had put the google breadcrumbs code on our website. We'll find the breadcrumbs that we put on our website on the Search Engine Result Page, its make your visitor easier to find any post on your website. And its will make Spider Bot easier to crawl your website. So it will increase your SERP.
Ok now lets we started the way to Create Google Breadcrumbs On Blogger.

1. Login to blogger
2. Design - Edit HTML - Expand widget template
3. Find this code on your template
<b:include data='top' name='status-message'/>
 And then paste this code below after that code.
<b:include data='posts' name='breadcrumb'/>
4. Ok, after that lets find this code
<b:includable id='post' var='posts'>
And than replace that code with this code below
<b:includable id='breadcrumb' var='posts'>
<b:if cond='data:blog.homepageUrl != data:blog.url'>
<b:if cond='data:blog.pageType == &quot;static_page&quot;'>
<div class='breadcrumbs'><span><a expr:href='data:blog.homepageUrl' rel='tag'>Home</a></span> &#187; <span><data:blog.pageName/></span></div>
<b:else/>
<b:if cond='data:blog.pageType == &quot;item&quot;'>
<!-- breadcrumb for the post page -->
<b:loop values='data:posts' var='post'>
<b:if cond='data:post.labels'>
<div class='breadcrumbs' xmlns:v='http://rdf.data-vocabulary.org/#'>
<span typeof='v:Breadcrumb'><a expr:href='data:blog.homepageUrl' property='v:title' rel='v:url'>Home</a></span>
<b:loop values='data:post.labels' var='label'>

 &#187; <span typeof='v:Breadcrumb'><a expr:href='data:label.url' property='v:title' rel='v:url'><data:label.name/></a></span>

</b:loop>
 &#187; <span><data:post.title/></span>
</div>
<b:else/>
<div class='breadcrumbs'><span><a expr:href='data:blog.homepageUrl' rel='tag'>Home</a></span> &#187; <span>Unlabelled</span> &#187; <span><data:post.title/></span></div>
</b:if>
</b:loop>
<b:else/>
<b:if cond='data:blog.pageType == &quot;archive&quot;'>
<!-- breadcrumb for the label archive page and search pages.. -->
<div class='breadcrumbs'>
<span><a expr:href='data:blog.homepageUrl'>Home</a></span> &#187; <span>Archives for <data:blog.pageName/></span>
</div>
<b:else/>
<b:if cond='data:blog.pageType == &quot;index&quot;'>
<div class='breadcrumbs'>
<b:if cond='data:blog.pageName == &quot;&quot;'>
<span><a expr:href='data:blog.homepageUrl'>Home</a></span> &#187; <span>All posts</span>
<b:else/>
<span><a expr:href='data:blog.homepageUrl'>Home</a></span> &#187; <span>Posts filed under <data:blog.pageName/></span>
</b:if>
</div>
</b:if>
</b:if>
</b:if>
</b:if>
</b:if>
</b:includable>
5. If you want to customize your breadcrumbs design, and want to your breadcrumbs design look like appear on my website. You can put this code below before code
.breadcrumbs {border: 1px solid #c1c1c1; background:#f1f1f1; font-family: 'Yanone Kaffeesatz', arial, serif; color:#999999; font-size: 15px; padding: 10px; margin-bottom: 10px;}
And then paste this code below after <head> code
<link href='http://fonts.googleapis.com/css?family=Yanone+Kaffeesatz' rel='stylesheet' type='text/css'/>
 6. Last step is save your template.
Ok thats its, i hope this tutorial will be useful for you. How to Create Google Breadcrumbs On Blogger
Next post "20 Best Font For Web Designer"
Read More Create Google Breadcrumbs On Blogger
Thursday, January 12, 2012

How To Change Blockquote Design On Blogger

How To Change Blockquote Design On Blogger, Change Blockquote On Blogger, Change The Blockquote Design On Blogger.
Hai guys, now i will share a tutorial to you. Its about "How To Change Your Blockquote Design On Blogger" I hope this tutorial will be useful for you. I think its not a great web design tutorial. But it may useful for you, exactly for a newbie blogger like me, who like to spice up their blog. Ok lets we started "How To Change Your Blog Quote Design On Blogger"

How To Change Blockquote Design On Blogger
1. Login to blogger
2. Design - Edit HTML - Expand Widget Template
3. Find </b:skin> code, and paste this code below BEFORE </b:skin> code
.blockquote {
-moz-border-radius-bottomleft:5px;
-moz-border-radius-bottomright:5px;
-moz-border-radius-topleft:5px;
-moz-border-radius-topright:5px;
background: #484B52 url(https://blogger.googleusercontent.com/img/b/R29vZ2xl/AVvXsEhG3kcAdX5JUV9DfOIE1js4DU1-_uo_U6MJR9AK5eNMiIkR_O4HloL8LK13IS0EFahi53nVHwATDXEGPDvfcPHCGTebNaDDkjIPGH7eY9QScjV8paCZtNYVXt6zeU1Nu0K0gSUxKBVsP40/s1600/green-black-side.gif) ;
background-position:;
background-repeat:repeat-y;
margin: 10 20px;
padding: 20px 20px 20px 50px;
color:#C7CACF;
font: normal 0.9em Helvetica, verdana, serif, Georgia, "Times New Roman";
}
And save your template. After that you can check is that work or not? Just create a new post and write any word on that post, and then click blockquote or just type a word between this code.
<blockquote>Type Your Word here</blockquote>
And you'll found a blockquote design like me, if you not like this blockquote design. You can edit the CSS code that i given to you. Just flow your creativty. OK thanks for follow up my blog
Latest post is "Dofollow Blog List 2012 With High Pagerank"
Read More How To Change Blockquote Design On Blogger
Friday, January 6, 2012

Create A Beautiful Advertisement Box

I always visit Spice Up Your Blog blog, because i think i can get many information about web design, sometimes i can get an idea because spice up your blog. And today im very excited because i think the "Advertise Here" Widget on spice up your blog is very beautiful and great. If you like that but you dont know how to create a beautiful advertisement box like that, i will give you a tutorial about that.
So Lets Create A Beautiful Advertisement Box

1. Login to blogger
2. Layout - Edit HTML
3. Paste this code below before </b:skin>
#advertisement{background:#81acc7; padding-top:60px; padding-bottom:65px; width: 250px;
-webkit-transition:all 0.2s ease;-moz-transition:all 0.2s ease;-o-transition:all 0.2s ease;
-moz-border-radius-bottomleft:15px;
-moz-border-radius-bottomright:3px;
-moz-border-radius-topleft:3px;
-moz-border-radius-topright:15px;
font-family: 'Yanone Kaffeesatz', arial, serif;
text-align:center; color:#fff;font-size: 18px;}
#advertisement:hover{background:#81acc7;
-moz-border-radius-bottomleft:60px;
-moz-border-radius-bottomright:3px;
-moz-border-radius-topleft:3px;
-moz-border-radius-topright:60px;}
#advertisement a:hover{color:#fff;}
55px; padding-bottom:57px; width: 125px; margin-bottom:10px; float:left;
-webkit-transition:all 0.2s ease;-moz-transition:all 0.2s ease;-o-transition:all 0.2s ease;
-moz-border-radius-bottomleft:15px;
-moz-border-radius-bottomright:3px;
-moz-border-radius-topleft:3px;
-moz-border-radius-topright:15px;
font-family: 'Yanone Kaffeesatz', arial, serif;
text-align:center; color:#fff;font-size: 18px;}
And then save your template
5. And now go to Layout - Page Element
6. Click add gadget - Add HTML/Javascript
7. And then paste this code below
<div id='advertisement'>
Advertise here
</div>
8. And then save it.
advertisement, advertise here, advertise here widget
"Advertise Here" Widget - Blog Yahyagan

advertisement, advertise here, advertise here widget
"Advertise Here" Widget Spice Up Your Blog
Try to place your mouse (cursor)  on the advertisement box, you'll see what happen. I thinks that's a really great hover effect.
Now you'll see how the code look like. I love the transtition effect. And remember i get this idea and inspired by SpiceUpYourBlog. Maybe sometime you can visit SpiceUpYourBlog, you'll find great blogger tutorial. So let's follow that blog.
Next time i will show you a tutorial, how to change blogger font.
Inspired By : SpiceUpYourBlog
Lets see next post, "3 Ways To Increase Your Visitor Massively"or "How to Change Blockquote Design On Blogger"
Read More Create A Beautiful Advertisement Box
Tuesday, December 20, 2011

Let's Create Very Beautiful And Simple Subscription Box

Hai guys, now i will give you a tutorial how to create a Very Beautiful Subscription Box below your post. Feedburner is a great google stuff, that stuff can make you share some article on your blog to feedburner automatically, like podcast. It can increase your visitor too, and now i will give you a tutorial how to Create a very Beautiful And Simple Subscription Blog Below Your Post.

1. Login to blogger
2. Go to design - edit HTML - Expand Widget Template
3. Find </b:skin> code and paste this code below before </b:skin> code
/*stay connected*/
.stay-connected {
-moz-border-radius-bottomleft:5px;
-moz-border-radius-bottomright:5px;
-moz-border-radius-topleft:5px;
-moz-border-radius-topright:5px;
background: #ffffff;
margin: 3px 0 3px 0;
padding: 5px;
border: 1px solid #E6E6E6;
overflow: auto;
}
#stay-icons {
float: left;
margin: 0 5px 0 0;
padding: 2px;
}
/*end stay connected*/
.yahya-email{
background:url(http://cdn2.iconfinder.com/data/icons/functionsocial/Social_Email_RSS.png) no-repeat 0px 12px ;
width:250px;
padding:10px 0 0 55px;
float:left;
font-size:1.4em;
font-weight:bold;
margin:0 0 10px 0;
color:#686B6C;
}
.yahya-emailsubmit{
background:#9B9895;
cursor:pointer;
color:#fff;
border:none;
padding:3px;
margin:0px 0px 0px 5px;
text-shadow:0 -1px 1px rgba(0,0,0,0.25);
-moz-border-radius:3px;
-webkit-border-radius:3px;
border-radius:3px;
font:12px sans-serif;
}
.yahya-emailsubmit:hover{
background:#81acc7;
}
4. Now lets find <p><data:post.body/></p> and paste this code after <p><data:post.body/></p>
<div class='yahya-email' style='margin-left:20px;'>
Subscribe via Email
<form action='http://feedburner.google.com/fb/a/mailverify' method='post' onsubmit='window.open(&apos;http://feedburner.google.com/fb/a/mailverify?uri=BlogYahyagan&apos;, &apos;popupwindow&apos;, &apos;scrollbars=yes,width=550,height=520&apos;);return true' target='popupwindow'>
<input class='textarea' gtbfieldid='3' name='email' onblur='if(this.value==&apos;&apos;)this.value=this.defaultValue;' onfocus='if(this.value==this.defaultValue)this.value=&apos;&apos;;' type='text' value='Enter Your Email'/><input name='uri' type='hidden' value='BlogYahyagan'/><input name='loc' type='hidden' value='en_US'/><input class='yahya-emailsubmit' type='submit' value='Subscribe'/>
</br><a href="http://blogyahyagan.blogspot.com">Want this widget on your blog? Click Here</a>
</form>
</div></td></tr></tbody></table></div>
</b:if>
5. And last step is change the text that colored blue with your feed burner url.
6. Save your template.
7. And you can see how your Subscription box look like
Lets Create Very Beautiful And Simple Subscription Box
Inspired by : http://www.spiceupyourblog.com
Lets see this awesome blogging tips Replace Post A Comment Text With A Cool Image On Blogger
Read More Let's Create Very Beautiful And Simple Subscription Box